Simple & Cheap DIY Nesting Boxes From Dresser Drawers
Make these simple & cheap DIY nesting boxes in no time with old dresser drawers and scrap wood following this simple tutorial. You'll soon have happy hens by following this quick guide.
Yield: 1
Cost: $0
Equipment
- Tape measure ( to measure boards)
- Pencil ( to mark cuts)
- Rafter Square (speed square) (to cut correct angles for your boards)
- Drill or impact driver
- Circular saw (to make cuts)
- Nail gun (optional, can use drill for entire project if desired)
- 2.5" framing nails (if using nail gun)
- 2 3/4" screws
Materials
- 4 Dresser Drawers: Ours were 26.5 x 14.5 x 6.5 - Size doesn't matter as long as they're big enough for nesting boxes. The important thing is that they are wood.
- Scrap Wood: We used:
- 4 : 42 inch boards for legs - adjust height as desired - we chose this length so we would have 18 inches below the boxes, and 10 inches in between.
- 4 : 53 inch boards (to support bottom of the drawers may not be required if your drawers are more sturdy than ours were
- 2 : 53 inch 2x2 boards for roost across boxes
- 4 : 14.5 inch boards to divide drawers from 1 big nesting box into 2 smaller nesting boxes.
- 12 inch 2x2 boards for lower sides of roost
- 6 inch by 2 inch boards for upper sides of roost
- *If your dresser drawers are different dimensions cut to fit your project*
Instructions
- How To Design Your Dresser Drawer Nesting Boxes:
- Our basic design for this nesting boxes was legs, and a cross support (made from the dresser drawers) we then added roosts to make it easier for the chickens to jump in to them.
- Step 1: Determine how high you want your nesting boxes to be. Use 4 boards that are the same length for the legs.
- step 2: Decide if you want your nesting boxes to have dividers or not. We cut 4 divider boards to make 8 nesting boxes from 4 drawers.
- Step 3: Choose whether you will reinforce the bottoms of the drawers or not. We chose to do this because the bottom of our dresser drawers were flimsy.
- Step 4: Decide if you want roosts across the boxes
- Step 5: Choose whether you want the top nesting boxes to have a board or not. We chose not to, and our chickens don't seem to mind.
- How To Assemble The Simple & Cheap DIY Nesting Boxes:
- Step 1. Find and measure your old drawers
- Step 2: Calculate the length of your 4 leg boards. How to do this: measure the height of your drawers, decide how much height you want between the nesting boxes, and how much height you want the nesting boxes to have off of the ground. This determines the length of your 4 leg boards. Example: Drawer height 7 inches x 2 drawers = 14 inches + 10 inch space in between drawers + 18 inches off the ground = 42 inches. You would need 4, 42 inch boards.
- Step 3: Use your circular saw and rafter square to cut boards to desired length.
- Step 4: Connect the drawers together using your drill. Do this by drilling 3 screws into each side of the two drawers you are connecting. both drawers should be sitting side by side facing forward.
- Step 5: For under-drawer support boards option: measure the length of the 2 screwed together drawers. Cut 2 boards the length of the 2 drawers using your circular saw and fasten them to the bottom of the connected drawers by drilling into the sides of the drawers.
- Step 6: For nesting box dividers: Measure the interior width of your drawers. Cut divider boards into that length and attach boards to drawers from the outside front and back of the dresser drawer with either your drill or nail gun.
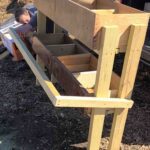
- Step 7: Turn the drawers on their side, mark where you want your legs positioned, and fasten 2 of the legs to one side of the drawers with either your drill or nail gun. Repeat on other side.
- Step 8. Once legs are attached, if you want a roost across for the chickens to hop on to, measure the entire length of the nesting boxes. Use your circular saw to cut your boards to match that length. Then cut 2 smaller boards to the length you want the roosts to be standing away from the nesting boxes. We did 12 inches for the bottom, and 6 inch for the top. Fasten to sides of nesting boxes using your drill.
- Step 9: If you'd like a top board for the upper nesting boxes to be covered, this is when you would cut that the length of the nesting boxes and secure it to the top of the boxes.
- Step 10: Secure the nesting boxes to the wall of your coop so that they don't fall on any unfortunate chickens! Fill with desired bedding, and let your chickens explore their new simple & cheap DIY nesting boxes!
Notes
Simple & Cheap DIY Nesting Boxes FAQS:
How big should nesting boxes be? Its recommended that they be at least 12x12" for the chickens to have enough room to be comfortable.
Will the chickens sleep in the nesting boxes? Not if they are not the highest surface in their coop. Have roosts that are higher, this will prevent them wanting to sleep in the nesting boxes.
Can you paint the nesting boxes? Sure! Paint or even peel & stick wallpaper is a cute and quirky addition to your chicken coop.
Can you use pallets as the spare wood for this project? Absolutely! Dismantle the pallet, and use the boards the same way you would any other scrap wood for this project.
How much height should be between my nesting boxes? We recommend between 8 and 12 inches depending on if you have larger or smaller chicken breeds.